


There
are a few ways to make the camera see infrared. The simplest way is
just to take an infrared filter and place it on the lens, go outside
with a tripod and start taking long exposure pictures.
However, this method is inconvenient, and it will make moving objects blurred.
Permanent Infrared and Full Spectrum Conversion
So
we will do camera conversion. Basically, there are two types of
infrared camera conversion: permanent infrared and full spectrum.
Permanent
infrared is handy when we do not have infrared filters or adapters for
each lens. It also allows us to see the subject through the viewfinder
on a DSLR camera.
Full spectrum conversion facilitates us to try
out new ideas and new filters. Perhaps, one day I want to shoot with a
590nm filter, and another day I want deep black with a 950nm filter.
We need then to buy infrared filters that fit our lens.
In all those two types the filter that blocks UV and IR light will be removed from the sensor.
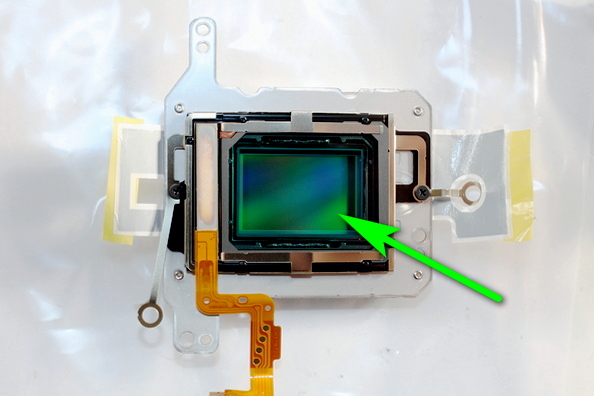
Different cameras have a different number of those filters. Canon DSLRs and
mirror-less cameras usually have two filters.
Sony mirror-less cameras have one thick filter.
Fujifilm compact cameras have one filter, and Fujifilm mirror-less cameras have two filters.
New
cameras have an ultrasonic sensor cleaning system. Some cameras like
Canon 60D have very clever firmware and detects that this is not the
original glass. It usually gives ERR 70. Disabling the automatic sensor
cleaning system, in this case, makes the camera work properly again.
Infrared Filters
Some
cameras are used for astrophotography. Those have a special filter that
passes Hydrogen Alpha light. The filter for this purpose would be
Astronomic.
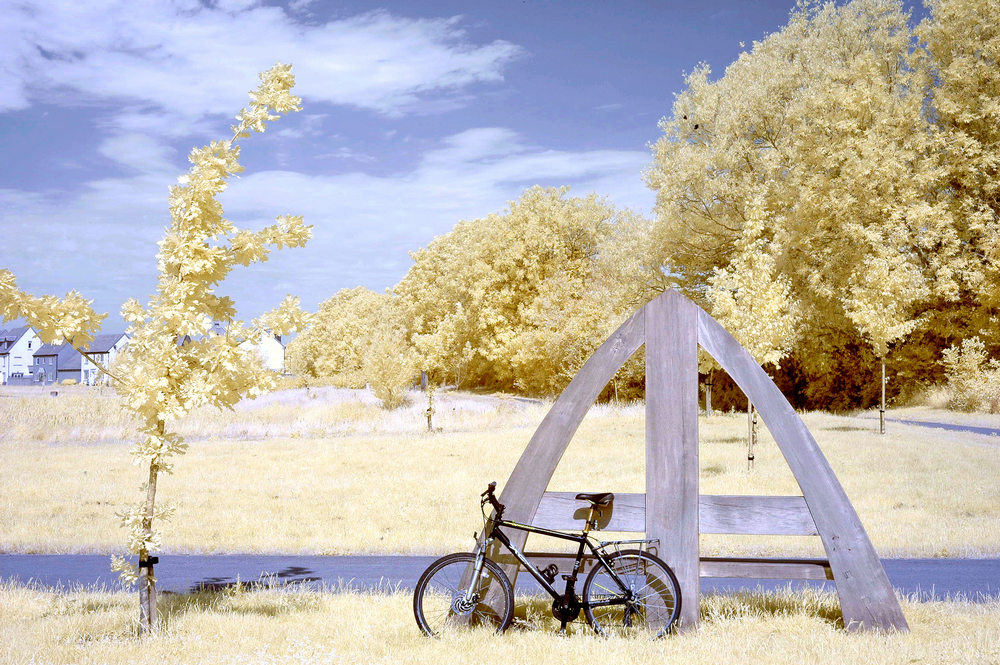
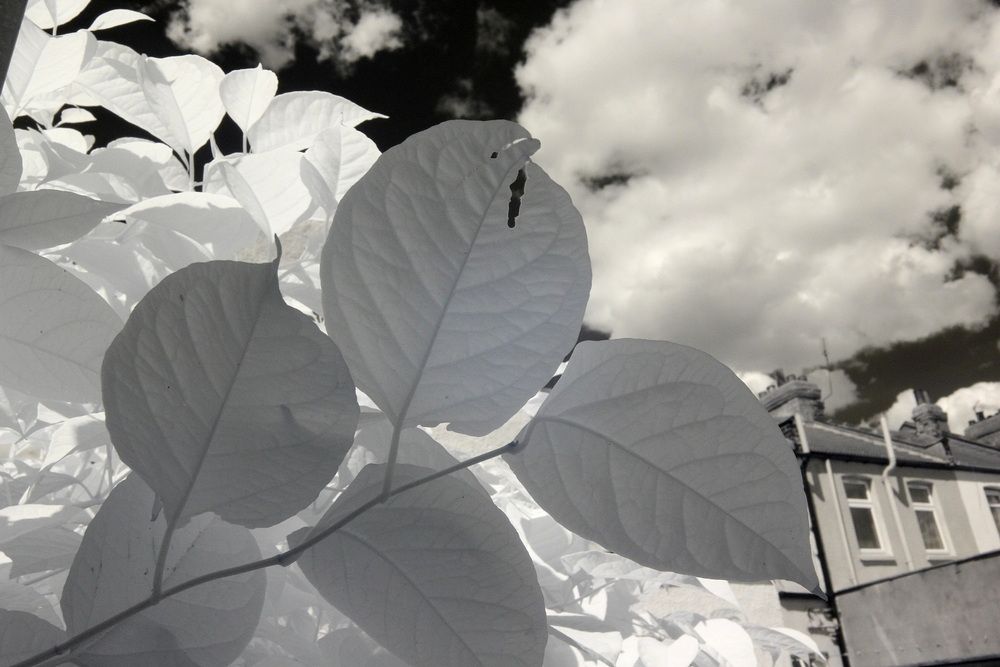
There are a few infrared filters. The most
well-known is the 720nm filter, often referred to as “standard”
infrared. It gives a slight grayish image straight from the camera.
Free Infrared Photography Guide Ebook in Italian PDF
- Product Code: Ebook
- Availability: In Stock
-
0.01€
Related Products
 With R72 Hoya Filter")
Infrared 720nm Converted Canon 1100D (Kiss X50, Rebel T3) With R72 Hoya Filter
Infrared 720nm Modified Canon 1100D (Kiss X50, Rebel T3) With R72 Hoya FilterThis camera has b..
249.00€
 For Black And White Photography")
Infrared 850nm Converted Refurbished Canon 1100D (X50, Rebel T3) For Black And White Photography
Infrared 850nm Converted Refurbished Canon 1100D for Landscapes, Ghost Hunting or Night Vision Photo..
189.00€

Infrared 950nm Converted Canon 1100D X50 Rebel T3
Infrared 950nm converted canon 1100D for landscapes, ghost hunting or night vision photography. ..
189.00€

Infrared 590nm Converted Canon 1100D X50 Rebel T3
Infrared 590 nm Converted Camera Canon EOS 1100D 12.2 MP (Body Only)Quick Auto-focus has been adjust..
189.00€
Astrophotography Modified Canon 1100D X50 Rebel T3 Ha 656.28nm Hydrogen Alpha Pass
Astrophotography Modified Canon 1100D (X50 Rebel T3).This camera has only the first infrared filter ..
189.00€

Full Spectrum Converted Sony A5000 Mirrorless Digital Camera UV Visible Infrared
The Camera focuses correctly with any lens any focal lengthCamera is in nice conditionPlease Note Th..
349.00€

Infrared 590nm Converted Sony A5000 Mirrorless Digital Camera
Please Note That The Battery Is Not Included.Please Buy The Battery Locally (it will cost around 10 ..
349.99€

Infrared 720nm Converted Sony A5000 Mirrorless Digital Camera With Infrared R72 Hoya Filter
Infrared 720nm Converted Sony A5000 Mirrorless Digital Camera With Infrared R72 Hoya Filter.For Surr..
399.99€

Infrared 850nm Converted Sony A5000 Mirrorless Digital Camera For Black And White Photography
Infrared 850 nm Converted Sony A5000 20.1MP Compact System CameraThis camera has been modified with ..
349.99€

Infrared 950nm Converted Sony A5000 Mirrorless Digital Camera
Please Note That The Battery Is Not Included.Please Buy The Battery Locally (it will cost around 10 ..
349.99€

Astrophotography Modified Canon 1200D X70 Rebel T5 Ha 656.28nm Hydrogen Alpha Pass
Astrophotography Modified Canon 1200D X70 Rebel T5. The Second Infrared Filter is Removed.Please Not..
279.00€

Infrared 720nm Modified Canon 1200D X70 Rebel T5 With R72 Hoya Filter
Infrared 720nm Modified Canon 1200D X70 Rebel T5 With R72 Hoya Filter.For surrealism photography. Pl..
279.00€

Full Spectrum Modified Canon 1200D X70 Rebel T5 UV Visible Infrared
Full Spectrum Infrared Converted Camera Canon EOS 1200D 18.0 MP (Body Only)A Conversion with a Boros..
279.00€

Infrared 850nm Modified Canon 1200D X70 Rebel T5 For Black And White Photography
Infrared 850 nm Converted Camera Canon EOS 1200D 18.0 MP (Body Only).A great example of a High Quali..
279.00€

Full Spectrum Converted Canon 1100D X50 Rebel T3 Suitable for Astrophotography UV Visible Infrared
Full Spectrum (UV, Visible Light, Infrared) Converted Camera Canon EOS 1100D 12.2 MP Suitable f..
189.00€
Infrared 950nm Modified Canon 1200D X70 Rebel T5
Infrared 950nm Modified Canon 1200D X70 Rebel T5.Please Note That The Battery Is Not Included.Please..
279.00€

Astrophotography Modified Canon EOS M Ha 656.28nm Hydrogen Alpha Pass
Astrophotography Modified Canon EOS M Ha 656.28nm Hydrogen Alpha Pass It Has The Second Infrared Fil..
449.00€

Full Spectrum Modified Canon EOS M UV Visible Infrared
Full Spectrum Infrared Converted Camera Canon EOS M 18.0 MP (Body Only)All the filters from the sens..
449.00€

Infrared 590nm Modified Canon EOS M
Infrared 590nm Modified Canon EOS MPlease Note That The Battery Is Not Included.Please Buy The Batte..
449.00€
Infrared 720nm Modified Canon EOS M With R72 Hoya Filter
Infrared 720nm Converted Canon EOS M Compact System Camera CSC Body Only (No Lens)A Conversion With ..
499.00€

Infrared 850nm Modified Canon EOS M For Black And White Photography
Infrared 850nm Modified Canon EOS MPlease Note That The Battery Is Not Included.Please Buy The Batte..
449.00€
Infrared 950nm Modified Canon EOS M
Infrared 950nm Modified Canon EOS MPlease Note That The Battery Is Not Included.Please Buy The Batte..
449.00€

Full Spectrum Converted Fujifilm S Series Camera UV Visible Infrared
You will receive one of the Full Spectrum Converted Fujifilm S2950, 2960, S2970 or S2980 camer..
259.00€

Astrophotography Modified Canon EOS M3 Second Infrared Filter Removed Body Only
Astro Modified Canon EOS M3 Body Only. The Second Infrared Filter Removed.This camera has a tilt scr..
399.00€
Infrared 590nm Modified Canon EOS M3 Mirror-less Camera Body Only
Infrared 590nm Modified Canon EOS M3 Mirror-less Camera Body OnlyPlease Note That The Battery Is Not..
399.00€
Full Spectrum Converted Canon EOS M3 Body Only UV Visible Infrared
Full Spectrum Converted Canon EOS M3 Body Only.The camera needs a EOS-M lens or it can accept EF-S l..
399.00€
Infrared 720nm Modified Canon EOS M3
Infrared 720nm Modified Canon EOS M3Please Buy The Battery Locally (it will cost around 10 EUR).Plea..
399.00€
Infrared 850nm Modified Canon EOS M3
Infrared 850nm Modified Canon EOS M3Please Note That The Battery Is Not Included.Please Buy The Batt..
399.00€
Infrared 950nm Modified Canon EOS M3
Infrared 950nm Modified Canon EOS M3Please Note That The Battery Is Not Included.Please Buy The Batt..
399.00€

Astrophotography Modified Canon 7D MK1 Ha 656.28nm Hydrogen Alpha Pass
Astrophotography Modified Canon 7D MK1 Ha 656.28nm Hydrogen Alpha PassAstro Modified Canon 7D MK1 Wi..
399.00€
Full Spectrum Converted Canon 7D MK1 good for Astrophotography UV Visible Infrared
Full Spectrum Converted Canon EOS 7D 18MP Digital SLR Camera Black (Body only)All the filters from t..
399.00€
Infrared 590nm Converted Canon 7D MK1
Infrared 590nm Converted Canon 7D MK1Broadcast quality digital camera for affordable price.Please No..
399.00€
Infrared 720nm Converted Refurbished Canon 7D MK1 With R72 Hoya Filter
Infrared 720nm Converted Refurbished Canon 7D MK1 With R72 Hoya Filter Broadcast quality digital cam..
449.00€
Infrared 850nm Converted Canon 7D MK1 For Black And White Photography
Infrared 850nm Converted Canon 7D MK1Broadcast quality digital camera for affordable price.For Black..
399.00€

Full Spectrum Converted Sony A5000 Mirrorless Digital Camera White UV Visible Infrared
Full Spectrum Sony A5000 20.1MP E-Mount Astro (Body Only, No Lens is Supplied)Color: WhiteThe Camera..
349.00€

Infrared 720nm Modified Canon EOS 40D With Hoya Filter
Infrared 720nm Canon EOS 40D 10.1MP DSLR Camera (Body Only) Quick Auto-focus has been adjusted ..
249.00€
Canon Camera Conversion for Astrophotography Service Astro
Camera Conversion for Astro Photography. The second Infrared filter will be removed.Your camera will..
149.00€
 Astro")
Astrophotography Modified Refurbished Canon 1300D (Rebel T6, Kiss X80) Astro
Astrophotography Modified Refurbished Canon 1300D 18.0 Megapixels (Rebel T6, Kiss X80)It has the Sec..
339.00€
 UV Visible Infrared")
Full Spectrum Modified Refurbished Canon 1300D (Rebel T6, Kiss X80) UV Visible Infrared
Full Spectrum Modified Refurbished Canon 1300D 18.0 Megapixels (Rebel T6, Kiss X80) If you want..
339.00€
Infrared 590nm Modified Refurbished Canon 1300D (Rebel T6, Kiss X80)
Infrared 590nm Modified Refurbished Canon 1300D 18.0 Megapixels (Rebel T6, Kiss X80) Please Not..
339.00€
Infrared 720nm Modified Refurbished Canon 1300D (Rebel T6, Kiss X80)
Infrared 720nm Modified Refurbished Canon 1300D 18.0 Megapixels (Rebel T6, Kiss X80) With R72 H..
339.00€
Infrared 850nm Modified Refurbished Canon 1300D (Rebel T6, Kiss X80)
Infrared 850nm Modified Refurbished Canon 1300D 18.0 Megapixels (Rebel T6, Kiss X80) Please Not..
339.00€
Infrared 950nm Modified Refurbished Canon 1300D (Rebel T6, Kiss X80)
Infrared 950nm Modified Refurbished Canon 1300D 18.0 Megapixels (Rebel T6, Kiss X80) Please Not..
339.00€
")
Astrophotography Modified Refurbished Canon 600D Second Infrared Filter Removed (EOS Kiss X5, EOS Rebel T3i)
Astrophotography Modified Refurbished Canon 600D Second Infrared Filter Removed (EOS Kiss X5,..
329.00€
Full Spectrum Converted Refurbished Canon 600D (EOS Kiss X5, EOS Rebel T3i) UV Visible Infrared
Full Spectrum Converted Refurbished Canon 600D (EOS Kiss X5, EOS Rebel T3i)The quick focus has been ..
329.00€
590nm Infrared Converted Refurbished Canon 600D (EOS Kiss X5, EOS Rebel T3i)
590nm Infrared Converted Refurbished Canon 600D (EOS Kiss X5, EOS Rebel T3i) With Vari-angle ScreenT..
329.00€
720nm Infrared Converted Refurbished Canon 600D (EOS Kiss X5, EOS Rebel T3i)
720nm Infrared Converted Refurbished Canon 600D (EOS Kiss X5, EOS Rebel T3i)The quick focus has been..
329.00€
850nm Infrared Converted Refurbished Canon 600D (EOS Kiss X5, EOS Rebel T3i)
850nm Infrared Converted Refurbished Canon 600D (EOS Kiss X5, EOS Rebel T3i)The quick focus has been..
329.00€
940nm Infrared Converted Refurbished Canon 600D (EOS Kiss X5, EOS Rebel T3i)
940nm Infrared Converted Refurbished Canon 600D (EOS Kiss X5, EOS Rebel T3i)The quick focus has been..
329.00€
 Ha Hydrogen Alpha Pass")
Astro Modified Refurbished Canon 650D (Kiss X6i, Rebel T4i) Ha Hydrogen Alpha Pass
Astro Modified Refurbished Canon 650D The Second Infrared Filter Removed (Kiss X6i, Rebel T4i)..
449.00€
Full Spectrum Modified Refurbished Canon 650D With Variable Angle LCD (Kiss X6i, Rebel T4i) UV Visible Infrared
Full Spectrum Modified Refurbished Canon 650D With Variable Angle LCD (Kiss X6i, Rebel T4i)The..
499.00€
")
Infrared 590nm Modified Refurbished Canon 650D Variable Angle Screen (Kiss X6i, Rebel T4i)
Infrared 590nm Modified Refurbished Canon 650D Variable Angle Screen (Kiss X6i, Rebel T4i)The quick ..
499.00€
Infrared 720nm Modified Refurbished Canon 650D Variable Angle Screen (Kiss X6i, Rebel T4i)
Infrared 720nm Modified Refurbished Canon 650D With Variable Angle Screen (Kiss X6i, Rebel T4i)The q..
499.00€
Infrared 850nm Modified Refurbished Canon 650D Variable Angle Screen (Kiss X6i, Rebel T4i)
Infrared 850nm Modified Refurbished Canon 650D With Variable Angle Screen (Kiss X6i, Rebel T4i)The q..
499.00€

Full Spectrum Converted Canon EOS M50 Body Only UV Visible Infrared
Full Spectrum Infrared UV Converted Camera Canon EOS M50 24.1 MP (Body Only)The camera focuses corre..
695.00€
Canon Camera Conversion To Infrared Service For Mirrorless Cameras
Canon Camera Conversion To Infrared Service For Mirrorless Cameras..
149.00€

Full Spectrum Converted Nikon D3100 DSLR Body Only UV Visible Infrared
Full spectrum Converted Nikon D3100 Body OnlyGreat Condition.It works perfectly and is ready to take..
250.00€

Conversion To A Full Spectrum Service For Sony A5000 A5100 UV Visible Infrared
Conversion To A Full Spectrum Service For Sony A5000 A5100 With a Borosilicate (Borofloat) glass...
149.00€
Astrophotography Conversion Service For Sony A5000 A5100 Digital Cameras
Astrophotography Conversion Service For Sony A5000 A5100 Digital Cameras. In addition to the visible..
149.00€

Full Spectrum Converted Panasonic G2 Mirrorless Digital Camera UV Visible Infrared
Full Spectrum UV Visible Infrared Converted Camera Panasonic G2 (Body Only)The camera is re-calibrat..
199.00€
Astrophotography Converted Sony A5000 Mirrorless Digital Camera Ha 656.28nm Hydrogen Alpha Pass
This camera is a perfect entry camera to start Astrophotography adventure.It is very small and light..
399.00€

Astrophotography Converted Sony A6000 Mirrorless Digital Camera Ha 656.28nm Hydrogen Alpha Pass
This camera is a perfect entry camera to start Astrophotography adventure.It is very small and light..
599.00€
Full Spectrum Converted Sony A6000 Mirror-less Digital Camera UV Visible Infrared
Full Spectrum Converted Sony A6000 Mirror-less Digital CameraThe UV/IR filter is replaced with a Bor..
599.00€
Astrophotography Converted Nikon D3100 Body Only Ha 656.28nm Hydrogen Alpha Pass
Astrophotography Converted Nikon D3100 Body OnlyGreat Condition.It works perfectly and is ready to t..
250.00€
Ultimate Astrophotography Modified Canon 1100D X50 Rebel T3 With Optolong L-Pro Clip-in Filter
Ultimate Astrophotography Modified Canon 1100D (X50 Rebel T3) Plus Optolong L-Pro Clip in FilterThe ..
389.00€

Infrared Filter For Fujifilm FinePix S2950 S2955 S2960 S2965 S2970 S2975 S2980 S2985 S2990 S2995
This infrared filter has been manufactured to fit Fujifilm S2900 series cameras. You do not need to ..
39.00€

Ultimate Astrophotography Modified Canon 1200D X70 Rebel T5 Kit With Optolong L-Pro Clip in Filter
Ultimate Astrophotography Modified Canon 1200D (X70 Rebel T5) Plus Optolong L-Pro Clip in FilterThe ..
459.00€
Ultimate Astrophotography Modified Canon 1300D X80 Rebel T6 With Optolong L-Pro Clip in Filter
Ultimate Astrophotography Modified Canon 1300D (X80 Rebel T6) Plus Optolong L-Pro Clip in Filt..
449.00€
 Clip-in Filter For APS-C Canon Cameras For Astrophotography")
Original Optolong CLS (City Light Suppression) Clip-in Filter For APS-C Canon Cameras For Astrophotography
This filter is suitable for non-modified Canon APS-C cameras and Canon cameras that still have the f..
99.00€

Original Optolong L-eNhance Clip-in Filter For APS-C Canon Cameras For Astrophotography
This filter is a universal filter and can be used on non-modified Canon Cameras andon a Full Spectru..
299.00€

Original Optolong L-Pro Clip-in Filter For APS-C Canon Cameras For Astrophotography
This filter is a universal filter and can be used on non-modified Canon Cameras andon a Full Spectru..
299.00€
Canon Camera Conversion to a Full Spectrum Service UV Visible Infrared
Canon Camera Conversion to a Full Spectrum. All filters will be removed from the sensor.For Canon 7D..
149.00€
Full Spectrum Converted Panasonic G2 + Zoom Lens + IR Filter Mirrorless Digital Camera Kit UV Visible Infrared
Full Spectrum UV Vis Infrared Converted Camera Panasonic G2 With a Zoom Lens Kit (No Battery)Y..
350.00€
Ultimate Astrophotography Modified Refurbished Canon 600D (EOS Kiss X5, EOS Rebel T3i) + Optolong L-Pro Filter
Ultimate Astrophotography Modified Refurbished Canon 600D (EOS Kiss X5, EOS Rebel T3i) + Optolong L-..
499.00€
Ultimate Astrophotography Kit Modified Canon 1100D X50 Rebel T3 Optolong L-Pro Clip-in Filter + 18-55 Kit Lens
Ultimate Astrophotography Kit Modified Canon 1100D X50 Rebel T3 Optolong L-Pro Clip-in Filter + 18-5..
449.00€
Ultimate Astrophotography Kit Modified Canon 1200D X70 Rebel T5 With Optolong L-Pro Clip in Filter + 18-55mm Lens
Ultimate Astrophotography Kit Modified Canon 1200D (X70 Rebel T5) Plus Optolong L-Pro Clip in Filter..
469.00€
Ultimate Astrophotography Kit Modified Canon 1300D X80 Rebel T6 With Optolong L-Pro Clip in Filter +18-55mm Lens
Ultimate Astrophotography Modified Canon 1300D (X80 Rebel T6) Plus Optolong L-Pro Clip in Filt..
499.00€

Infrared 720nm Filter For DIY Camera Conversion Fits Canon 1100D, 1200D, 1300D, EOS M, EOS M3
Infrared 720nm Filter For DIY Camera Conversion. Fits Canon 1100D, 1200D, 1300D, EOS M, EOS M3,..
34.00€

Infrared 720nm Filter For DIY Camera Conversion Fits Sony A5000 A5100
Infrared 720nm Filter For DIY Camera Conversion Fits Sony A5000 A5100.Thickness is 1.2mm...
29.00€

Infrared 535nm Filter For DIY Camera Conversion Fits Canon 1100D, 1200D, 1300D, EOS M, EOS M3
Infrared 535nm Filter For DIY Camera Conversion. The filter fits Canon 1100D, 1200D, 1300D, EOS M,&n..
39.00€
Infrared 550nm Filter For DIY Camera Conversion Fits Canon 1100D, 1200D, 1300D, EOS M, EOS M3
Infrared 550nm Filter For DIY Camera Conversion. The filter fits Canon 1100D, 1200D, 1300D, EOS M,&n..
29.00€
Infrared 565 nm Filter For DIY Camera Conversion Fits Canon 1100D, 1200D, 1300D, EOS M, EOS M3
Infrared 565nm Filter For DIY Camera Conversion. The filter fits Canon 1100D, 1200D, 1300D, EOS M,&n..
29.00€
Infrared 580 nm Filter For DIY Camera Conversion Fits Canon 1100D, 1200D, 1300D, EOS M, EOS M3
Infrared 580 nm Filter For DIY Camera Conversion. The filter fits Canon 1100D, 1200D, 1300D, EOS M,&..
29.00€
Infrared 535nm Filter For DIY Camera Conversion Fits Sony A5000 A5100
Infrared 535nm Filter For DIY Camera Conversion. The filter fits Sony A5000, A5100.Thickness is 1.2m..
29.00€
Infrared 550nm Filter For DIY Camera Conversion Fits Sony A5000 A5100
Infrared 550nm Filter For DIY Camera Conversion. The filter fits Sony A5000, A5100.Thickness is 1.2m..
29.00€
Infrared 565nm Filter For DIY Camera Conversion Fits Sony A5000 A5100
Infrared 565nm Filter For DIY Camera Conversion. The filter fits Sony A5000, A5100.Thickness is 1.2m..
29.00€
Infrared 580nm Filter For DIY Camera Conversion Fits Sony A5000 A5100
Infrared 580nm Filter For DIY Camera Conversion. The filter fits Sony A5000, A5100.Thickness is 1.2m..
29.00€

Infrared 600nm Filter For DIY Camera Conversion Fits Canon 1100D, 1200D, 1300D, EOS M, EOS M3
Infrared 600nm Filter For DIY Camera Conversion. Fits Canon 1100D, 1200D, 1300D, EOS M, EOS M3,..
29.00€
Infrared 610nm Filter For DIY Camera Conversion Fits Canon 1100D, 1200D, 1300D, EOS M, EOS M3
Infrared 610nm Filter For DIY Camera Conversion. Fits Canon 1100D, 1200D, 1300D, EOS M, EOS M3,..
29.00€
Infrared 630nm Filter For DIY Camera Conversion Fits Canon 1100D, 1200D, 1300D, EOS M, EOS M3
Infrared 630nm Filter For DIY Camera Conversion. Fits Canon 1100D, 1200D, 1300D, EOS M, EOS M3,..
29.00€
Infrared 640nm Filter For DIY Camera Conversion Fits Canon 1100D, 1200D, 1300D, EOS M, EOS M3
Infrared 640nm Filter For DIY Camera Conversion. Fits Canon 1100D, 1200D, 1300D, EOS M, EOS M3,..
29.00€
Infrared 650nm Filter For DIY Camera Conversion Fits Canon 1100D, 1200D, 1300D, EOS M, EOS M3
Infrared 650nm Filter For DIY Camera Conversion. Fits Canon 1100D, 1200D, 1300D, EOS M, EOS M3,..
29.00€
Infrared 670nm Filter For DIY Camera Conversion Fits Canon 1100D, 1200D, 1300D, EOS M, EOS M3
Infrared 670nm Filter For DIY Camera Conversion. Fits Canon 1100D, 1200D, 1300D, EOS M, EOS M3,..
29.00€
Infrared 685nm Filter For DIY Camera Conversion Fits Canon 1100D, 1200D, 1300D, EOS M, EOS M3
Infrared 685nm Filter For DIY Camera Conversion. Fits Canon 1100D, 1200D, 1300D, EOS M, EOS M3,..
29.00€
Infrared 700nm Filter For DIY Camera Conversion Fits Canon 1100D, 1200D, 1300D, EOS M, EOS M3
Infrared 700nm Filter For DIY Camera Conversion. Fits Canon 1100D, 1200D, 1300D, EOS M, EOS M3,..
29.00€
Infrared 600nm Filter For DIY Camera Conversion Fits Sony A5000 A5100
Infrared 600nm Filter For DIY Camera Conversion. Fits Canon Sony A5000 A5100Thickness is 1.2mm.This ..
29.00€
Infrared 610nm Filter For DIY Camera Conversion Fits Sony A5000 A5100
Infrared 610nm Filter For DIY Camera Conversion. Fits Sony A5000 A5100Thickness is 1.2mm.This filter..
29.00€
Infrared 630nm Filter For DIY Camera Conversion Fits Sony A5000 A5100
Infrared 630nm Filter For DIY Camera Conversion. Fits Sony A5000 A5100.Thickness is 1.2mm.This filte..
29.00€
Infrared 640nm Filter For DIY Camera Conversion Fits Sony A5000 A5100
Infrared 640nm Filter For DIY Camera Conversion. Fits Sony A5000 A5100Thickness is 1.2mm.This filter..
29.00€
Infrared 650nm Filter For DIY Camera Conversion Fits Sony A5000 A5100
Infrared 650nm Filter For DIY Camera Conversion. Fits Sony A5000 A5100.Thickness is 1.2mm.This filte..
29.00€
Infrared 670nm Filter For DIY Camera Conversion Fits Sony A5000 A5100
Infrared 670nm Filter For DIY Camera Conversion. Fits Sony A5000 A5100.Thickness is 1.2mm.This filte..
29.00€
Infrared 685nm Filter For DIY Camera Conversion Fits Sony A5000 A5100
Infrared 685nm Filter For DIY Camera Conversion. Fits Sony A5000 A5100.Thickness is 1.2mm.This filte..
29.00€
Infrared 700nm Filter For DIY Camera Conversion Fits Sony A5000 A5100
Infrared 700nm Filter For DIY Camera Conversion. Fits Sony A5000 A5100.Thickness is 1.2mm.This filte..
29.00€

Infrared 760 nm Filter For DIY Camera Conversion Fits Canon 1100D, 1200D, 1300D, EOS M, EOS M3
Infrared 760 nm Filter For DIY Camera Conversion. Fits Canon 1100D, 1200D, 1300D, EOS M, EOS M3..
29.00€
Infrared 780 nm Filter For DIY Camera Conversion Fits Canon 1100D, 1200D, 1300D, EOS M, EOS M3
Infrared 780 nm Filter For DIY Camera Conversion. Fits Canon 1100D, 1200D, 1300D, EOS M, EOS M3..
29.00€
Infrared 800 nm Filter For DIY Camera Conversion Fits Canon 1100D, 1200D, 1300D, EOS M, EOS M3
Infrared 800 nm Filter For DIY Camera Conversion. Fits Canon 1100D, 1200D, 1300D, EOS M, EOS M3..
29.00€
Infrared 830 nm Filter For DIY Camera Conversion Fits Canon 1100D, 1200D, 1300D, EOS M, EOS M3
Infrared 830 nm Filter For DIY Camera Conversion. Fits Canon 1100D, 1200D, 1300D, EOS M, EOS M3..
29.00€
Infrared 850 nm Filter For DIY Camera Conversion Fits Canon 1100D, 1200D, 1300D, EOS M, EOS M3
Infrared 850 nm Filter For DIY Camera Conversion. Fits Canon 1100D, 1200D, 1300D, EOS M, EOS M3..
29.00€
Infrared 760 nm Filter For DIY Camera Conversion Fits Sony A5000 A5100
Infrared 760 nm Filter For DIY Camera Conversion. Fits Sony A5000 A5100.Thickness is 1.2mm.This filt..
29.00€
Infrared 780 nm Filter For DIY Camera Conversion Fits Sony A5000 A5100
Infrared 780 nm Filter For DIY Camera Conversion. Fits Sony A5000 A5100.Thickness is 1.2mm.This filt..
29.00€
Infrared 830 nm Filter For DIY Camera Conversion Fits Sony A5000 A5100
Infrared 830 nm Filter For DIY Camera Conversion. Fits Sony A5000 A5100.Thickness is 1.2mm.This filt..
29.00€
Infrared 850 nm Filter For DIY Camera Conversion Fits Sony A5000 A5100
Infrared 850 nm Filter For DIY Camera Conversion. Fits Sony A5000 A5100.Thickness is 1.2mm.This filt..
29.00€

Full Spectrum Converted Refurbished Canon 50D UV Visible Infrared
Full Spectrum Converted Refurbished Canon 50DThe quick focus has been adjusted for 50mm focal length..
279.00€
Astrophotography Converted Refurbished Canon 50D
Astrophotography Converted Refurbished Canon 50DThe quick focus has been adjusted for 50mm focal len..
259.00€

Astrophotography Modified Canon 100D X7 Rebel SL1 Ha 656.28nm Hydrogen Alpha Pass
Astrophotography Modified Canon 100D (X7 Rebel SL1).This camera has only the first infrared filter o..
319.00€
Full Spectrum Modified Canon 100D X7 Rebel SL1 UV Visible Infrared
Full Spectrum Modified Canon 100D (X7 Rebel SL1).All filters are removed from the sensor.Please Note..
319.00€
720nm infrared IR Converted Nikon D3100 DSLR Body Only
720nm infrared IR Converted Nikon D3100 DSLR Body OnlyGreat Condition.It works perfectly and is read..
250.00€
850 nm infrared IR Converted Nikon D3100 DSLR Body Only
850 nm infrared IR Converted Nikon D3100 DSLR Body OnlyGreat Condition.It works perfectly and is rea..
250.00€

720nm infrared IR Converted Nikon D3200 DSLR Body Only
720nm infrared IR Converted Nikon D3200 DSLR Body OnlyGreat Condition.It works perfectly and is read..
299.00€

850 nm infrared IR Converted Nikon D3200 DSLR Body Only
850 nm infrared IR Converted Nikon D3200 DSLR Body OnlyGreat Condition.It works perfectly and is rea..
299.00€
Astrophotography Converted Nikon D3200 Body Only Ha 656.28nm Hydrogen Alpha Pass
Astrophotography Converted Nikon D3200 Body OnlyGreat Condition.It works perfectly and is ready to t..
299.00€
Full Spectrum Converted Nikon D3200 DSLR Body Only
Full spectrum Converted Nikon D3200 Body OnlyGreat Condition.It works perfectly and is ready to take..
299.00€

720nm infrared IR Converted Nikon D3300 DSLR Body Only
720nm infrared IR Converted Nikon D3300 DSLR Body OnlyGreat Condition.It works perfectly and is read..
339.00€

850 nm infrared IR Converted Nikon D3300 DSLR Body Only
850 nm infrared IR Converted Nikon D3300 DSLR Body OnlyGreat Condition.It works perfectly and is rea..
339.00€
Astrophotography Converted Nikon D3300 Body Only Ha 656.28nm Hydrogen Alpha Pass
Astrophotography Converted Nikon D3300 Body OnlyGreat Condition.It works perfectly and is ready to t..
359.00€
Full Spectrum Converted Nikon D3300 DSLR Body Only
Full spectrum Converted Nikon D3300 Body OnlyGreat Condition.It works perfectly and is ready to take..
339.00€
720 nm Infrared Modified Canon 100D X7 Rebel SL1
720 nm Infrared Modified Canon 100D (X7 Rebel SL1)Please Note That The Battery Is Not Included.Pleas..
319.00€
850 nm Infrared Modified Canon 100D X7 Rebel SL1
850 nm Infrared Modified Canon 100D (X7 Rebel SL1)Please Note That The Battery Is Not Included.Pleas..
319.00€
590 nm Infrared Modified Canon 100D X7 Rebel SL1
590 nm Infrared Modified Canon 100D (X7 Rebel SL1)Please Note That The Battery Is Not Included.Pleas..
319.00€
720 nm Infrared Converted Panasonic G2 Mirrorless Digital Camera
720 nm Infrared Converted Camera Panasonic G2 (Body Only)The camera is re-calibrated for infinity fo..
199.00€
850 nm Infrared Converted Panasonic G2 Mirrorless Digital Camera
850 nm Infrared Converted Camera Panasonic G2 (Body Only)The camera is re-calibrated for infinity fo..
199.00€
535 nm Infrared Converted Panasonic G2 Mirrorless Digital Camera
535 Infrared Converted Camera Panasonic G2 (Body Only)The camera is re-calibrated for infinity focus..
199.00€
550 nm Infrared Converted Panasonic G2 Mirrorless Digital Camera
550 Infrared Converted Camera Panasonic G2 (Body Only)The camera is re-calibrated for infinity focus..
199.00€
580 nm Infrared Converted Panasonic G2 Mirrorless Digital Camera
580 Infrared Converted Camera Panasonic G2 (Body Only)The camera is re-calibrated for infinity focus..
199.00€
590 nm Infrared Converted Panasonic G2 Mirrorless Digital Camera
590 Infrared Converted Camera Panasonic G2 (Body Only)The camera is re-calibrated for infinity focus..
199.00€
600 nm Infrared Converted Panasonic G2 Mirrorless Digital Camera
600 nm Infrared Converted Camera Panasonic G2 (Body Only)The camera is re-calibrated for infinity fo..
199.00€
610 nm Infrared Converted Panasonic G2 Mirrorless Digital Camera
610 nm Infrared Converted Camera Panasonic G2 (Body Only)The camera is re-calibrated for infinity fo..
199.00€
630 nm Infrared Converted Panasonic G2 Mirrorless Digital Camera
630 nm Infrared Converted Camera Panasonic G2 (Body Only)The camera is re-calibrated for infinity fo..
199.00€
650 nm Infrared Converted Panasonic G2 Mirrorless Digital Camera
650 nm Infrared Converted Camera Panasonic G2 (Body Only)The camera is re-calibrated for infinity fo..
199.00€
680 nm Infrared Converted Panasonic G2 Mirrorless Digital Camera
680 nm Infrared Converted Camera Panasonic G2 (Body Only)The camera is re-calibrated for infinity fo..
199.00€
700 nm Infrared Converted Panasonic G2 Mirrorless Digital Camera
700 nm Infrared Converted Camera Panasonic G2 (Body Only)The camera is re-calibrated for infinity fo..
199.00€
760 nm Infrared Converted Panasonic G2 Mirrorless Digital Camera
760 Infrared Converted Camera Panasonic G2 (Body Only)The camera is re-calibrated for infinity focus..
199.00€
780 nm Infrared Converted Panasonic G2 Mirrorless Digital Camera
780 nm Infrared Converted Camera Panasonic G2 (Body Only)The camera is re-calibrated for infinity fo..
199.00€
800 nm Infrared Converted Panasonic G2 Mirrorless Digital Camera
800 Infrared Converted Camera Panasonic G2 (Body Only)The camera is re-calibrated for infinity focus..
199.00€
830 nm Infrared Converted Panasonic G2 Mirrorless Digital Camera
830 Infrared Converted Camera Panasonic G2 (Body Only)The camera is re-calibrated for infinity ..
199.00€
930 nm Infrared Converted Panasonic G2 Mirrorless Digital Camera
930 nm Infrared Converted Camera Panasonic G2 (Body Only)The camera is re-calibrated for infinity fo..
199.00€
940nm Infrared Converted Panasonic G2 Mirrorless Digital Camera
940 nm Infrared Converted Camera Panasonic G2 (Body Only)The camera is re-calibrated for infinity fo..
199.00€
Infrared 720nm Filter For DIY Camera Conversion Fits Canon 20D
Infrared 720nm Filter For DIY Camera Conversion Fits Canon 20DThickness is 2.7mm..
29.00€

Conversion To A Full Spectrum Service For Olympus Cameras
Conversion To A Full Spectrum Service For Olympus Cameras..
179.00€
Conversion To Infrared Service For Olympus Cameras
Conversion To Infrared Service For Olympus Cameras..
179.00€
Astrophotography Conversion Service For Sony A6000 Digital Cameras
Astrophotography Conversion Service For Sony A6000 Digital Cameras. In addition to the visible spect..
159.00€

Astrophotography Converted Nikon D5000 Body Only Ha 656.28nm Hydrogen Alpha Pass Astro Mod Body Only
Astrophotography Converted Nikon D5000 Body OnlyGreat Condition.It works perfectly and is ready to t..
250.00€
Full Spectrum Converted Nikon D5000 Body Only UV IR Visible Light
Full Spectrum Converted Nikon D5000 Body Only UV IR Visible LightGreat Condition.It works perfectly ..
249.00€
Infrared 590 nm Converted Nikon D5000 Body Only
Infrared 590 nm Converted Nikon D5000 Body OnlyIt works with DX lenses.The camera is in a good condi..
249.00€
Infrared 720 nm Converted Nikon D5000 Body Only
Infrared 720 nm Converted Nikon D5000 Body OnlyIt works with DX lenses.The camera is in a good condi..
249.00€
Infrared 850 nm Converted Nikon D5000 Body Only
Infrared 850 nm Converted Nikon D5000 Body OnlyIt works with DX lenses.The camera is in a good condi..
249.00€
Infrared 940 nm Converted Nikon D5000 Body Only
Infrared 940 nm Converted Nikon D5000 Body OnlyIt works with DX lenses.The camera is in a good condi..
249.00€

Nikon D7000 Conversion Service To Full Spectrum UV Visible Infrared
We will convert your Nikon D7000 to a Full Spectrum...
144.00€
Full Spectrum Conversion Service for Canon EOS M UV Visible Infrared
Full Spectrum Conversion ServiceAll the filters from the sensor will be removed.Live View mode focus..
149.00€

Astrophotography Modified Canon EOS M6 Second Infrared Filter Removed Body Only
Astro Modified Canon EOS M6 Body Only. The Second Infrared Filter Removed.This camera has a tilt scr..
499.00€
Full Spectrum Converted Canon EOS M6 Body Only UV Visible Infrared
Full Spectrum Converted Canon EOS M6 Body Only.The camera needs a EOS-M lens or it can accept EF-S l..
499.00€
Infrared 590nm Modified Canon EOS M6 Mirror-less Camera Body Only
Infrared 590nm Modified Canon EOS M6 Mirror-less Camera Body OnlyPlease Note That The Battery Is Not..
499.00€
Infrared 720nm Modified Canon EOS M6
Infrared 720nm Modified Canon EOS M6Please Buy The Battery Locally (it will cost around 10 EUR).Plea..
499.00€
Infrared 850nm Modified Canon EOS M6
Infrared 850nm Modified Canon EOS M6Please Note That The Battery Is Not Included.Please Buy The Batt..
499.00€
Infrared 950nm Modified Canon EOS M6
Infrared 950nm Modified Canon EOS M6Please Note That The Battery Is Not Included.Please Buy The Batt..
499.00€
Astro Photography Converted Canon EOS M50 Body Only Ha 656 nm Pass
Astro Photography Converted Canon EOS M50 Ha 656 nm Pass 24.1 MP (Body Only)The camera focuses corre..
695.00€
Full Spectrum Modified Camera Canon 1200D X70 Rebel T5 UV Visible Infrared with Kit Lens and IR Filter
Full Spectrum Modified Camera Canon 1200D X70 Rebel T5 UV Visible Infrared with Kit Lens and IR Filt..
369.00€

Astrophotography Converted Refurbished Canon 70D
Astrophotography Converted Refurbished Canon 70DThe quick focus has been adjusted for 50mm focal len..
499.00€
Infrared IR Conversion Service For Sony A6000 Digital Cameras
Infrared IR Conversion Service For Sony A6000 Digital Cameras...
185.00€
2 X Full Spectrum Modified Cameras Canon 1200D X70 Rebel T5 UV Visible Infrared with Kit Lens and IR Filters
2 X Full Spectrum Modified Cameras Canon 1200D X70 Rebel T5 UV Visible Infrared with Kit Lens and IR..
499.00€
Full Spectrum Converted Canon 7D MK1 Kit With 18-55 mm Lens UV Visible Infrared
Full Spectrum Converted Canon 7D MK1 Kit With 18-55 mm Lens UV Visible InfraredAll the filters from ..
429.00€
Full Spectrum Conversion Service For Sony A6000 Digital Cameras
Full Spectrum Conversion Service For Sony A6000 Digital Cameras ..
159.00€
Full Spectrum Conversion Service For Sony A6000 Digital Cameras
Full Spectrum Conversion Service For Sony A6000 Digital Cameras.All filters will be removed...
149.00€
Infrared Photography Kit 850nm Converted Canon EOS M50 With 18-55 Kit Lens
Infrared Photography Kit 850nm Converted Canon EOS M50 With 18-55 Kit LensThe camera focuses correct..
749.00€
Canon Camera Conversion To Infrared Service for 1100D 1200D 1300D 500D 600D 650D 40D 50D 60D 70D Series Cameras
Canon Camera Conversion To Infrared Service for 1100D 1200D 1300D 500D 600D 650D 40D 50D 60D 70D Ser..
159.00€

Full Spectrum Converted Canon 5DMK2 good for Astrophotography UV Visible Infrared
Full Spectrum Converted Canon EOS 5D MK2 Digital SLR Camera Black (Body only)All the filters from th..
490.00€
Astrophotography Modified Canon 5D MK2 Ha 656.28nm Hydrogen Alpha Pass
Astrophotography Modified Canon 5D MK2 Ha 656.28nm Hydrogen Alpha PassAstro Modified Canon 5D MK2 Wi..
529.00€
Infrared 850nm Converted Canon 5D MK2 For Black And White Photography
Infrared 850nm Converted Canon 5D MK2 For Black And White PhotographyBroadcast quality digital camer..
529.00€
Infrared 720 nm Converted Canon 5D MK2
Infrared 720 nm Converted Canon 5D MK2Broadcast quality digital camera for affordable price.Please N..
529.00€
Infrared 590 nm Converted Canon 5D MK2
Infrared 590 nm Converted Canon 5D MK2Broadcast quality digital camera for affordable price.Please N..
529.00€
Infrared 590 nm Filter For DIY Camera Conversion Fits Canon 1100D, 1200D, 1300D, EOS M, EOS M3
Infrared 590 nm Filter For DIY Camera Conversion. The filter fits Canon 1100D, 1200D, 1300D, EOS M,&..
39.00€
Infrared 720nm Converted Sony A6000 Mirrorless Digital Camera With Infrared R72 Hoya Filter
Infrared 720nm Converted Sony A6000 Mirrorless Digital Camera With Infrared R72 Hoya Filter.For Surr..
599.00€

Multispectral Imaging Nikon D800 Camera Kit
Multispectral Imaging Nikon D800 Camera Kit includes:- One Nikon D800 DSLR Camera (36 MP, CMOS senso..
1,599.00€

720nm infrared IR Converted Nikon D5100 DSLR Body Only
720nm infrared IR Converted Nikon D5100 DSLR Body OnlyGreat Condition.It works perfectly and is read..
299.00€
850 nm infrared IR Converted Nikon D5100 DSLR Body Only
850 nm infrared IR Converted Nikon D5100 DSLR Body Only Great Condition.It works perfectly and is re..
299.00€
Astrophotography Converted Nikon D5100 Body Only Ha 656.28nm Hydrogen Alpha Pass
Astrophotography Converted Nikon D5100 Body OnlyGreat Condition.It works perfectly and is ready to t..
279.00€
Full Spectrum Converted Nikon D5100 DSLR Body Only UV Visible Infrared
Full spectrum Converted Nikon D5100 Body OnlyGreat Condition.It works perfectly and is ready to take..
299.00€

720nm infrared IR Converted Nikon D5200 DSLR Body Only
720nm infrared IR Converted Nikon D5200 DSLR Body OnlyGreat Condition.It works perfectly and is read..
329.00€
850 nm infrared IR Converted Nikon D5200 DSLR Body Only
850 nm infrared IR Converted Nikon D5200 DSLR Body Only Great Condition.It works perfectly and is re..
339.00€
Astrophotography Converted Nikon D5200 Body Only Ha 656.28nm Hydrogen Alpha Pass
Astrophotography Converted Nikon D5200 Body OnlyGreat Condition.It works perfectly and is ready to t..
329.00€
Full Spectrum Converted Nikon D5200 DSLR Body Only UV Visible Infrared
Full spectrum Converted Nikon D5200 Body OnlyGreat Condition.It works perfectly and is ready to take..
329.00€

720nm infrared IR Converted Nikon D5300 DSLR Body Only
720nm infrared IR Converted Nikon D5300 DSLR Body OnlyGreat Condition.It works perfectly and is read..
359.00€
850 nm infrared IR Converted Nikon D5300 DSLR Body Only
850 nm infrared IR Converted Nikon D5300 DSLR Body Only Great Condition.It works perfectly and is re..
359.00€
Astrophotography Converted Nikon D5300 Body Only Ha 656.28nm Hydrogen Alpha Pass
Astrophotography Converted Nikon D5300 Body OnlyGreat Condition.It works perfectly and is ready to t..
369.00€
Full Spectrum Converted Nikon D5300 DSLR Body Only UV Visible Infrared
Full spectrum Converted Nikon D5300 Body OnlyGreat Condition.It works perfectly and is ready to take..
359.00€
Infrared 720 nm Converted Sony A6000 Mirrorless Digital Camera With Infrared
Infrared 720 nm Converted Sony A6000 Mirrorless Digital Camera With Infrared.For Surrealism Photogra..
579.00€
Infrared 720nm Converted Sony A5000 Mirrorless Digital Camera With Infrared 720nm
Infrared 720nm Converted Sony A5000 Mirrorless Digital Camera With Infrared 720nmFor Surrealism Phot..
379.00€
Full Spectrum Conversion Service For Sony A6300 and A6400 Digital Cameras
Full Spectrum Conversion Service For Sony A6300 and A6400 Digital Cameras ..
169.00€

Astrophotography Converted Sony A7 Mirrorless Digital Camera Ha 656.28nm Hydrogen Alpha Pass
This camera is a perfect entry camera to start Astrophotography adventure.It is very small and light..
599.00€

Full Spectrum Converted Sony A7 Mirror-less Digital Camera UV Visible Infrared
Full Spectrum Converted Sony A7 Mirror-less Digital CameraThe UV/IR filter is replaced with a Borosi..
599.00€
Infrared 720 nm Converted Sony A7 Mirrorless Digital Camera With Infrared
Infrared 720 nm Converted Sony A7 Mirrorless Digital Camera With Infrared.For Surrealism Photography..
579.00€
Infrared 590 nm Converted Sony A6000 Mirrorless Digital Camera With Infrared
Infrared 590 nm Converted Sony A6000 Mirrorless Digital Camera With Infrared.For Surrealism Pho..
579.00€
Infrared 850 nm Converted Sony A6000 Mirrorless Digital Camera With Infrared
Infrared 850 nm Converted Sony A6000 Mirrorless Digital Camera With Infrared.For Surrealism Photogra..
579.00€
Infrared 590 nm Converted Sony A7 Mirrorless Digital Camera With Infrared
Infrared 590 nm Converted Sony A7 Mirrorless Digital Camera With Infrared.For Surrealism Photog..
579.00€
Infrared 850 nm Converted Sony A7 Mirrorless Digital Camera With Infrared
Infrared 850 nm Converted Sony A7 Mirrorless Digital Camera With Infrared.For Surrealism Photography..
579.00€
Astrophotography Conversion Service For Canon 5D MK2 Ha 656.28nm Hydrogen Alpha Pass
Astrophotography Conversion Service For Canon 5D MK2 Ha 656.28nm Hydrogen Alpha Pass..
169.00€

Conversion To A Full Spectrum Service For OM SYSTEM OM-5 Cameras With Focusing Adjustment
Conversion To A Full Spectrum Service For OM SYSTEM OM-5 Cameras With Focusing Adjustment..
199.00€
Full Spectrum Converted Sony A5000 Mirrorless Digital Camera UV Visible Infrared Plus Sony E PZ 16-50mm f/3.5-5.6 OSS Lens
Full Spectrum Converted Sony A5000 Mirrorless Digital Camera UV Visible Infrared Plus Sony E PZ 16-5..
419.00€